![]()
Editors
Opening editors
CarveToy provides an editor for each module in the project, which can be accessed from the module's preview card.
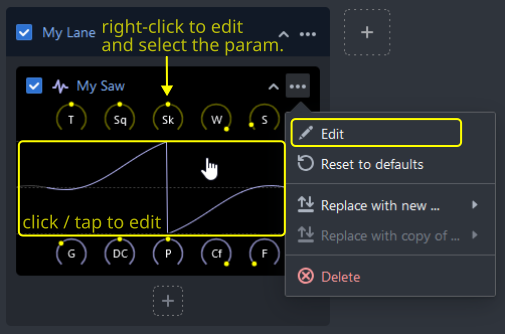
The editor can be opened by:
- Clicking or tapping directly on the preview card,
- Using the ... menu in the top right corner of the card,
- Right-clicking on a knob, which opens the editor and selects the tab for the clicked parameter.
The common editor UI
All editors share a similar user interface and functionality, though some may offer additional options specific to their type.
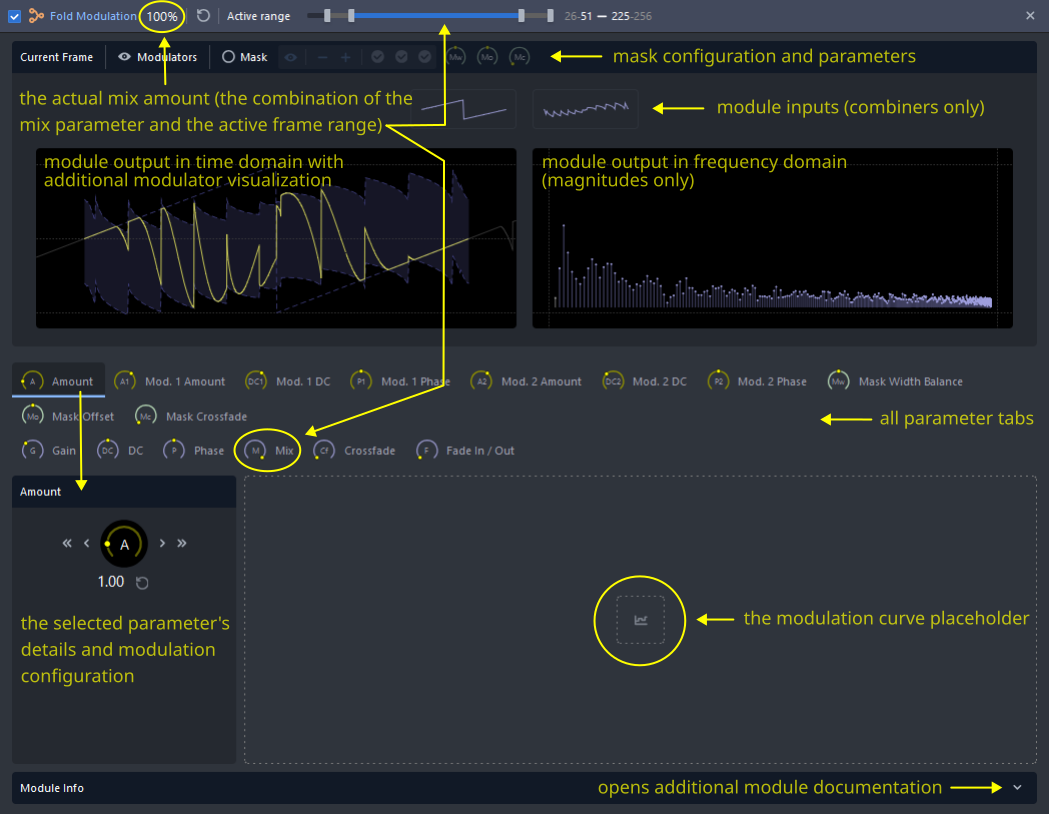
Editors provide access to all parameters, modulation configurations and curves, time domain visualizations, frequency domain visualizations, documentation, and additional module-specific tools.
The active range
Effect and combiner editors include an "active range" configuration that influences the module's mix. The active range determines the blend of the effect, where 0% represents a dry (or pass-through) signal and 100% represents a fully wet signal. The active range modifies the mix amount based on the current frame index.
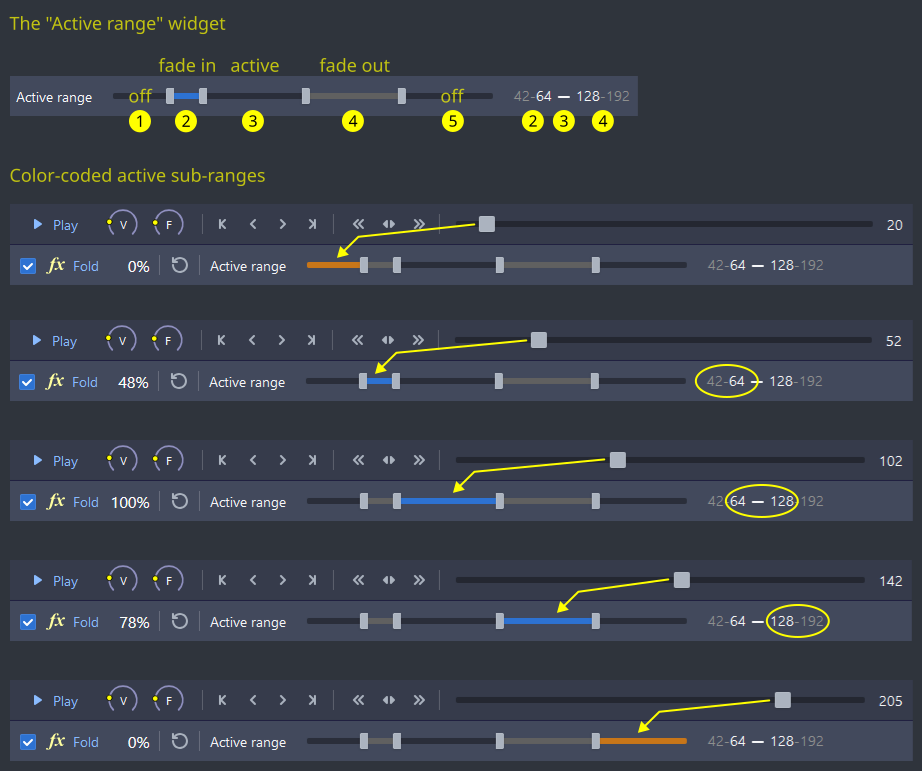
The active range comprises the following five segments:
- The inactive range before the start,
- The fade-in range,
- The active range,
- The fade-out range,
- The inactive range after the end.
By default, the active range is set to 1-256, while the other segments default to 0. The active range is combined (multiplied) with the mix parameter value to determine the final mix value of a module. You can use both the active range and the mix parameter to fine-tune the final mix behavior.
Masking
A mask is a tool used to additionally shape the sound before it exits a module. Currently, masks operate only in the time domain. They can be applied to both effects and combiners.
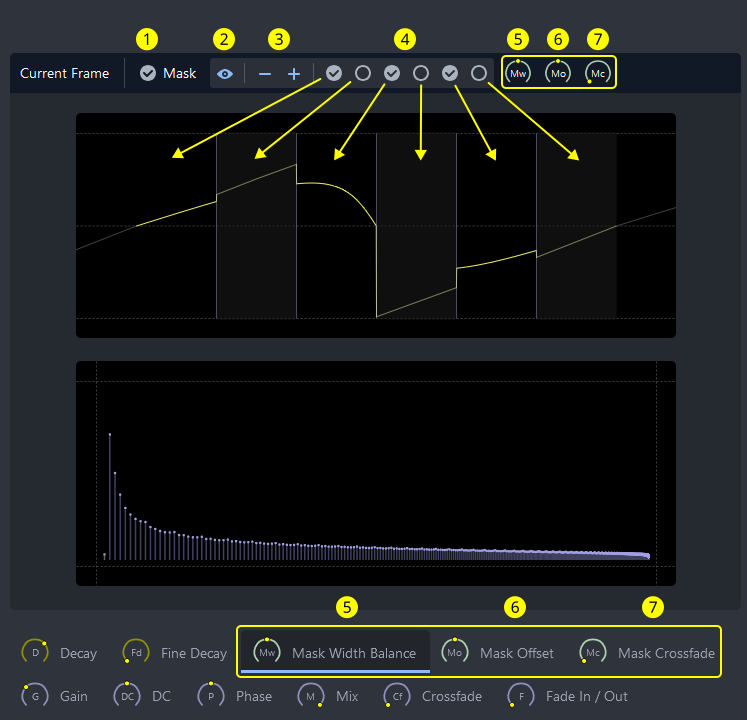
A mask divides the current frame into multiple sequential chunks in the time domain. Each chunk can be either active or inactive. Active chunks contain audio data processed by the current module’s algorithm, while inactive chunks use the unprocessed input data (pass-through chunks).
The mask's UI widget allows you to:
- Enable or disable the mask,
- Show or hide the additional mask visualization over the frame data,
- Define the desired number of chunks (up to 16),
- Set the active-inactive pattern of the chunks,
- Adjust the width of the chunks,
- Set the offset of chunks from the start of the current frame,
- Control the cross-fading amount between adjacent chunks.
All mask-specific parameters (knobs) are accessible through the mask widget and are also available in the parameter tabs. They can be used and modulated in the same way as other parameters.
Parameter modulation
If people were more like octopi, manually adjusting all knobs might be sufficient. However, since we lack enough extremities, modulation comes to the rescue by automating parameter changes.
In CarveToy, modulation is the only method for producing wavetables with evolving sounds. Unless you are after singe-cycle waveforms, you will need to modulate something.
CarveToy features a single parameter modulation source: the frame index. As the frame index changes, the values of the modulated parameters also change. Modulation can be applied across the entire 1-256 frame range or within a custom sub-range.
Modulation curves
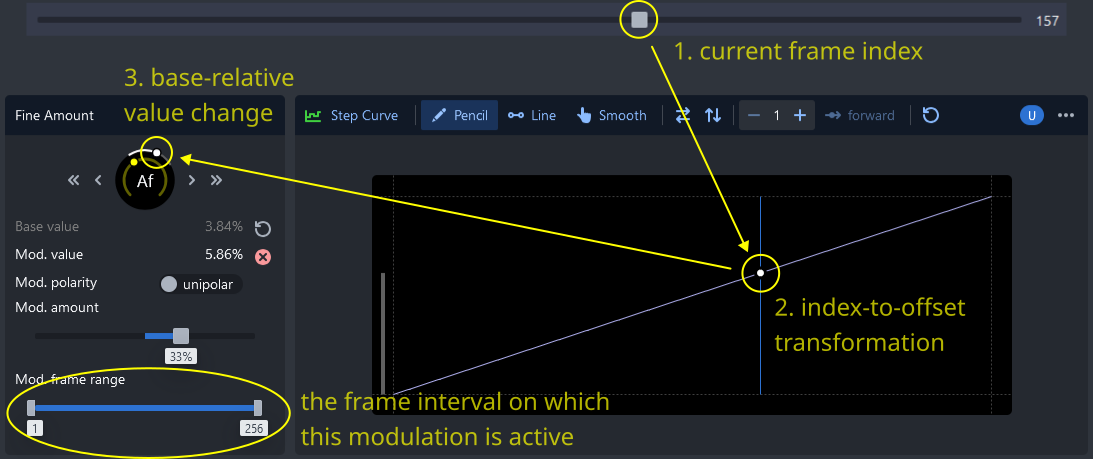
The current frame index influences the modulation of each parameter through its modulation curve. You can use as many modulation curves as needed.
Modulation curves can be added, edited, deleted, renamed, and copied. The same curve instance can be reused multiple times.
The step curve
Step-based curves are currently the only type supported. They consist of 256 values that can be freely painted, smoothed, repeated, and flipped. When first created or reset, they default to a basic linear curve.
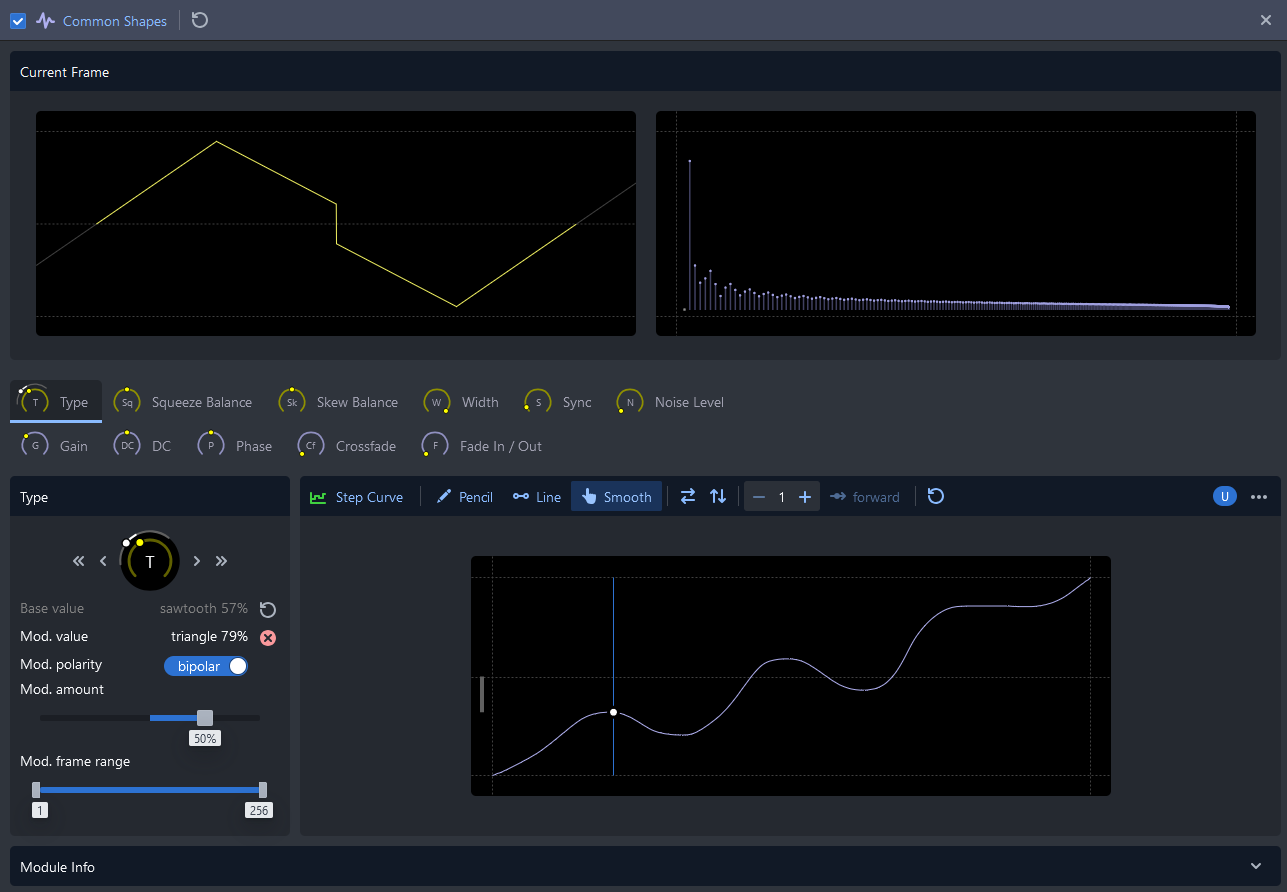
Generators
Generators produce the basic sound in a lane. They are fully active across the entire 1-256 frame range. For convenience, PWM, Sync, and (amplitude) Noise effects are included with most generators.
Effects
Effects process the input signal using a specific algorithm and return the result as the output signal.
(Dear reader,
If you're the primary target audience for this tool, you might find this information so basic that it could cause some eye-rolling, yawning, or even a facepalm. I needed an introductory line, and this is what came out 🤷♂️. It’s certainly not my intention to lecture anyone about what effects are.)

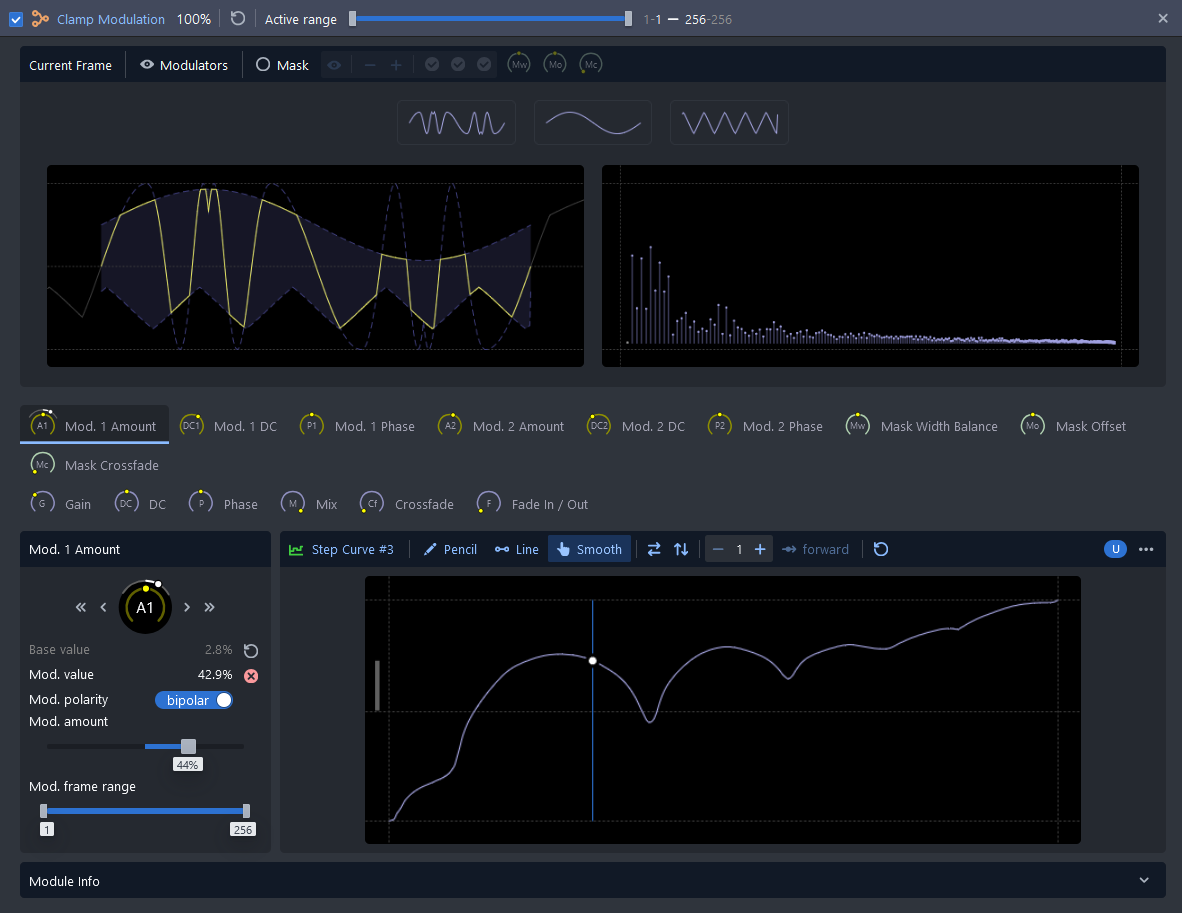
Combiners
Combiners use one or more input signals, combine them using specific algorithms, and produce a single output signal. For more details, see combiners.
The combiner editor shows all input signals. The first signal is the main signal, while the others are typically modulators.
The example below shows two modulators used to set the positive and negative amplitude boundaries for the original signal.
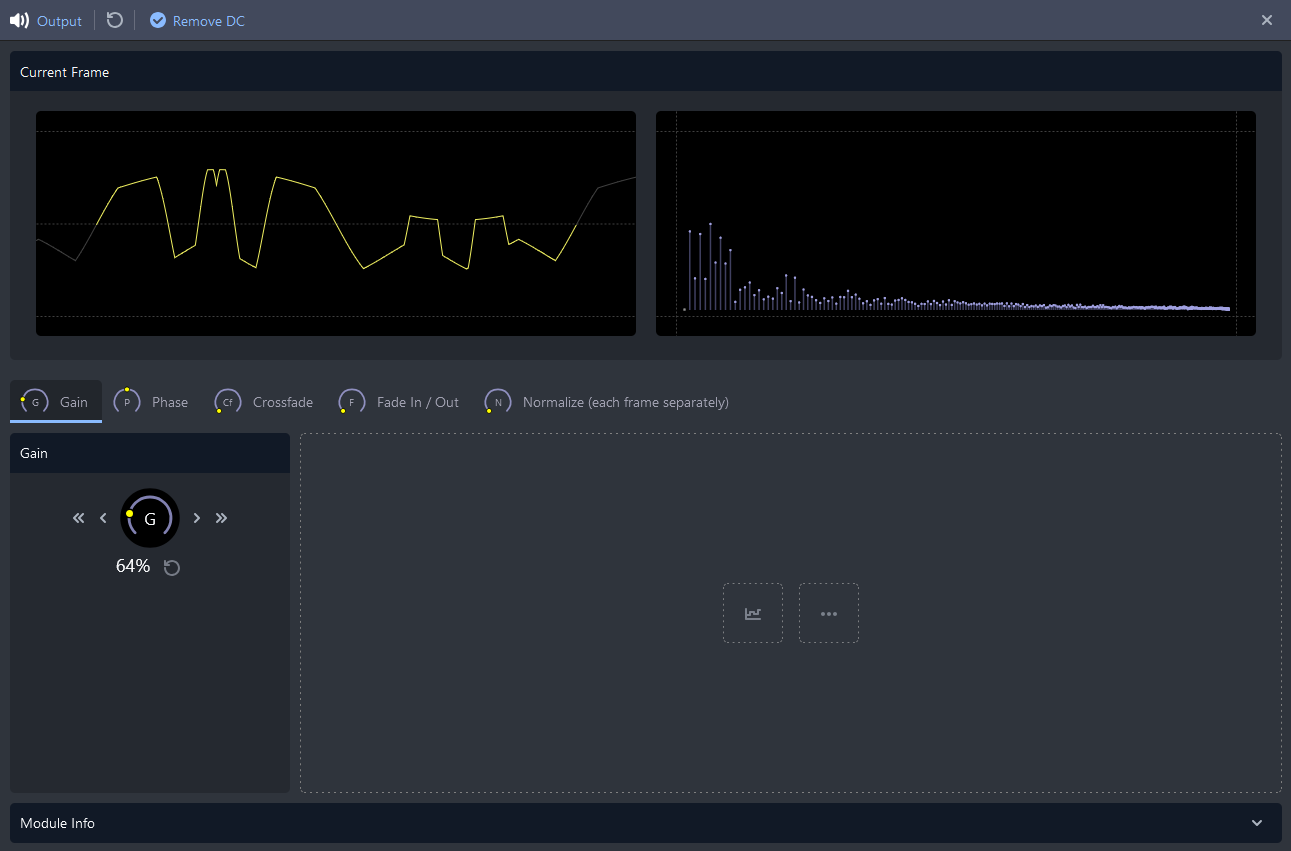
The Output
The output module is the final module in the signal chain, and its output is forwarded to the sound engine or the rendering engine.
You can remove the DC offset (the default), adjust the output gain, normalize the output, or use common parameters to influence the final sound.
Unlike other modules, the output module hard-clips excessive amplitude values. This introduces saturation, which might be desirable in some cases. However, if saturation is intended, applying a dedicated saturation effect at the end of a lane might be a better approach.
Note
A word about normalization.
The output module allows you to normalize each frame individually. This means that frames with low sample amplitudes will have their gain increased disproportionately compared to frames with already high sample amplitudes. This process can significantly alter the sound and may or may not produce the desired effect.
Alternatively, the Render & Download feature provides an option to normalize the entire wavetable at once. This approach retains the amplitude ratios among all samples in the wavetable, preserving the overall balance of the sound.